Friday, February 20, 2009

View the raw SOAP messages (only) in ILM 2 trace log

Have you come across the advice to "turn on tracing" in ILM 2 to view the raw SOAP messages? Earlier this week, I spent a whole day trying to figure out the best way to do this, and it turns out it's REALLY SIMPLE. But first, some background. :)

I said to myself, "Self, this should be possible with a network sniffer, right?" I downloaded Netmon; wow, that was ugly, and I never even found the SOAP messages. Then I tried Ethereal/Wireshark; no luck. EffeTech HTTP sniffer; nada. I was about to try TcpMon and/or SOAP Trace Utility, when I had a revelation. This stuff's built on Windows Communication Foundation; shouldn't there be a utility to trace this sophisticated API? Finally, this was the right question to ask.

Turns out the message tracing is built into WCF. And while you may have enabled tracing in your ILM 2 web service, there's actually a way to enable tracing on only the SOAP messages. Nice, huh? Here's a link to the MSDN article on how to turn on message logging, but I'll go through the exact steps for you to try to save you some time.

Before I begin, I should mention that Andreas Kjellman posted an answer to a question on the Connect site on how to enable tracing, but his directions weren't exclusive to the SOAP messages.

  1. Begin by locating your web service config file. Mine is at C:\Program Files\Microsoft Identity Management\Common Services\Microsoft.ResourceManagement.Service.exe.config. Edit the file and add the following bold sections.
    <configuration>

    ...


    <!-- Begin Message Logging/Tracing -->
    <system.diagnostics>
    <trace autoflush="true" />
    <sources>
    <source name="System.ServiceModel.MessageLogging">
    <listeners>
    <add
    name="messages"
    type="System.Diagnostics.XmlWriterTraceListener"
    initializeData="c:\logs\Messages.svclog" />
    </listeners>
    </source>
    </sources>
    </system.diagnostics>
    <!-- End Message Logging/Tracing -->

    ...

    <system.serviceModel>


    <!-- Begin Message Logging/Tracing Settings -->
    <diagnostics>
    <messageLogging
    logEntireMessage="true"
    logMalformedMessages="true"
    logMessagesAtServiceLevel="true"
    logMessagesAtTransportLevel="false"
    maxMessagesToLog="0x7fffffff"
    maxSizeOfMessageToLog="0x7fffffff"/>
    </diagnostics>
    <!-- End Message Logging/Tracing Settings -->

    ...

    </system.serviceModel>

    ...

    </configuration>


  2. As Andreas points out in his instructions, make sure the service host account has write permissions to the C:\logs folder.

  3. Save the file and restart the Microsoft Identity Lifecycle Manager Service (IdentityManagementService).

    The log file can grow pretty quickly, so you may want to isolate the logging to only a few requests. To stop logging, simply comment the listener (shown here) and restart the service.


    <!--<add name="messages"
    type="System.Diagnostics.XmlWriterTraceListener"
    initializeData="c:\logs\Messages.svclog" />
    -->

  4. The .svclog file will open in the Service Trace Viewer (SvcTraceViewer.exe), which is installed with the Windows SDK for Windows Server 2008 and .NET Framework 3.5. Just try double-clicking the file first, if you're not sure you have it installed. You might also find it at C:\Program Files\Microsoft SDKs\Windows\v6.1\Bin\SvcTraceViewer.exe (or similar).

  5. In the Service Trace Viewer, click on the activity in the left pane and click on a message log trace. In the bottom pane, you'll see the details of the SOAP message. Click on the XML tab in the bottom pane and you'll find the SOAP envelope in its entirety inside the trace XML (SOAP envelope begins with "s:Envelope").

I hope this helps you. Best of luck!
Thursday, February 12, 2009

Who's this b0b guy anyway?

If you find yourself strolling through the ILM 2 service trace logs, and you happen upon a gentleman named b0b (short for b0b36673-d43b-4cfa-a7a2-aff14fd90522), try as you may to introduce yourself, he wishes to remain anonymous. ;)

Tuesday, February 10, 2009

Generate AccountName in ILM 2 custom workflow activity

I saw a question on the ILM 2 Connect site, and thought it would be a good candidate for a blog. I've been working with my esteemed colleagues Brad Turner and David Lundell on some ILM 2 engagements, and they do a fantastic job at leading by example.

Here I will show you how to create a custom workflow activity for ILM 2 in which you can generate an account name from the first/last name and update the target resource. Keep in mind that this blog entry is written in the context of the ILM "2" Release Candidate. For RTM, you should be able to do this with the function evaluator.

For simplicity, let's start with the Ensynch diagnostic activity. This handy little project contains an existing deployment-ready custom workflow activity that you can drop into any ILM 2 workflow.

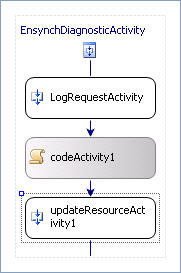
Open the project in Visual Studio and double-click the EnsynchDiagnosticActivity.cs file. Drag a CodeActivity and an UpdateResourceActivity onto the design surface. Your design surface should now look like this:


In the properties window of the CodeActivity, bind the ExecuteCode property to a new method named "generateAccountName". This is where we'll write all of our custom code to generate the account name and submit it for update on the target object.

In the properties window of the UpdateResourceActivity, bind the ResourceId property to a new field named "TargetId", and bind the UpdateParameters to a new field named "MyUpdateParameters". Please use caution when binding these properties, and if you're unsure of what you're doing, you can follow these instructions to avoid a potential pitfall.

Note that the Ensynch diagnostic activity already contains a CurrentRequestActivity, which reads the current Request object. We'll use that to get the Target ID, and assign that to the TargetId field. Then, we'll submit the account name by adding it to the UpdateParameters collection.

Open the EnsynchDiagnosticActivity in the code editor and edit the generateAccountName method. We'll use a simple method for generating the account name, by combining the first and last name that we read from the Request parameters. In the interest of brevity, we'll forgo error checking on the account name. Note that we are using the built-in Request method to parse the Request parameters.


//--- Generate the account name from the Request parameters.
string accountName = "";
// Get the request parameters from the Request object.
ReadOnlyCollection<CreateRequestParameter> requestParameters =
this.currentRequest.ParseParameters<CreateRequestParameter>();
foreach (CreateRequestParameter requestParameter in requestParameters)
{
// Simply combine the first, last names to generate the account name.
if (requestParameter.PropertyName == "FirstName")
{
accountName = requestParameter.Value.ToString() + accountName;
}
else if (requestParameter.PropertyName == "LastName")
{
accountName = accountName + requestParameter.Value.ToString();
}
}

Now we'll grab the Target GUID from the currentRequest object and assign that to the field that we bound to the UpdateResourceActivity. We're essentially telling the UpdateResource to update the Target object, but note that we could just as easily update other objects (if the requestor has permission, of course).


//--- Tell the UpdateResourceActivity to update the Target object.
TargetId = currentRequest.Target.GetGuid();

Finally, we'll tell the UpdateResourceActivity to update the AccountName on the Target by adding the attribute to the UpdateParameters collection.


//--- Add the account name to the update parameters.
MyUpdateParameters = new UpdateRequestParameter[]
{
new UpdateRequestParameter("AccountName",
UpdateMode.Modify, accountName)
};

That's it for the generateAccountName method. One more thing we have to do for a successful build/deployment is to remove the initialization of the bound fields at the class level. Not sure where the problem lies, but this seems to fix it:


public Guid TargetId;
public UpdateRequestParameter[] MyUpdateParameters;

Now you have yourself a bona fide account name generator. You can follow the Ensynch walkthrough to learn how to deploy and test the activity. One final note: we haven't given any thought to ensuring uniqueness in this exercise. You have been warned!

Enjoy!