The SQL Server 2008 R2 Import and Export Wizard will allow you to import a CSV ‘flat’ file directly into SQL Azure. The process is relatively simple, but it’s not obvious. The following steps will help guide you through the process.
The SQL Server Import and Export Wizard is available on the SQL Server 2008 R2 media, so you must obtain your organization’s copy of SQL Server 2008 R2 software.
1. Run the wizard from the Windows Start menu, Start à Programs à SQL Server 2008 R2 à Import and Export Data.
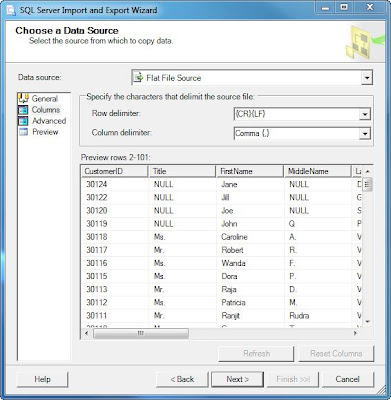
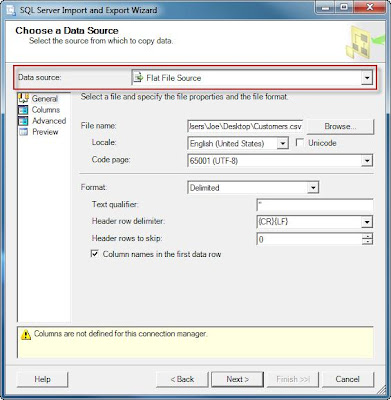
2. Select Flat File Source as the data source, browse for your CSV file, and then select the settings appropriate for your file. For example, the fields in my file are surrounded by double-quotes if they contain commas, so I select double-quotes as my text qualifier. Also, the column names are found in the first row of my file. Click Next.
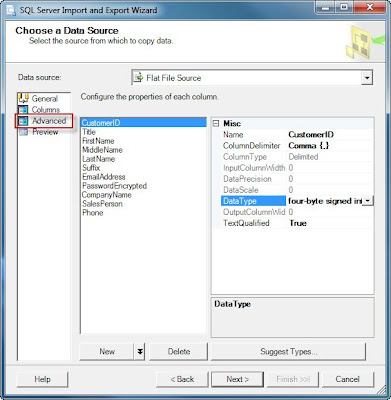
4. Remember that the wizard is looking at a flat file, so it doesn’t make many assumptions about the data contained therein. It’s up to you to go through each column in this screen and adjust data types and sizes. The following table shows a mapping of data types between the wizard and SQL Server. Click Next after you’ve made your changes.
| Data Type | SQL Server (SQLOLEDB; SQLNCLI10) |
| DT_BOOL | bit |
| DT_BYTES | binary, varbinary, timestamp |
| DT_CY | smallmoney, money |
| DT_DATE | |
| DT_DBDATE | date |
| DT_DBTIME | |
| DT_DBTIME2 | time(p) |
| DT_DBTIMESTAMP | datetime, smalldatetime |
| DT_DBTIMESTAMP2 | datetime2 |
| DT_DBTIMESTAMPOFFSET | datetimeoffset(p) |
| DT_DECIMAL | |
| DT_FILETIME | |
| DT_GUID | uniqueidentifier |
| DT_I1 | |
| DT_I2 | smallint |
| DT_I4 | int |
| DT_I8 | bigint |
| DT_NUMERIC | decimal, numeric |
| DT_R4 | real |
| DT_R8 | float |
| DT_STR | char, varchar |
| DT_UI1 | tinyint |
| DT_UI2 | |
| DT_UI4 | |
| DT_UI8 | |
| DT_WSTR | nchar, nvarchar, sql_variant, xml |
| DT_IMAGE | image |
| DT_NTEXT | ntext |
| DT_TEXT | text |
Table 1 - Data type mappings (source: http://msdn.microsoft.com/en-us/library/ms141036.aspx)
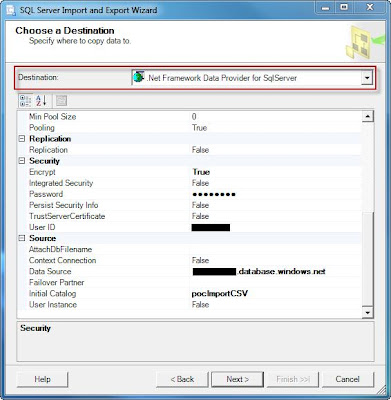
5. Here’s the part that’s not obvious. You must select .Net Framework Data Provider for SqlServer as the destination. Then, enter the following information.
· Data Source – This is the fully qualified DNS name (FQDN) of your SQL Azure server.
· Initial Catalog – This must be an existing database on the SQL Azure server.
· User ID
· Password
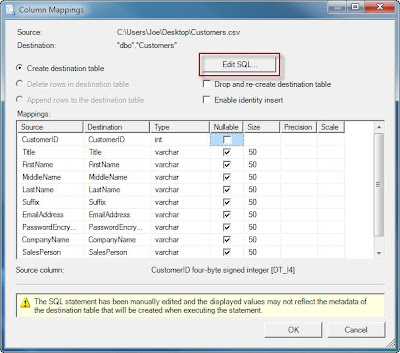
7. Uncheck the Nullable box for your primary key column. Did I mention that a SQL Azure table must have a primary key? Notice that there isn’t a way to specify the primary key in this dialog. We’ll have to add that to the SQL statement manually. Click the Edit SQL button.
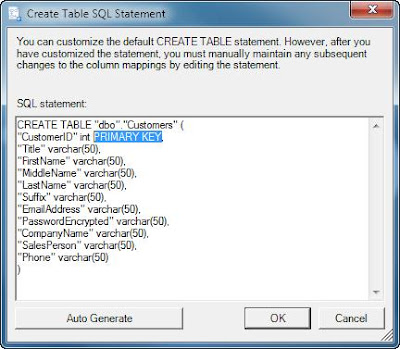
8. Add the “Primary Key” option to the declaration of your primary key column, and click OK.
Note: If you’re using a clustered primary key, please see SQL Server Books Online for the syntax.
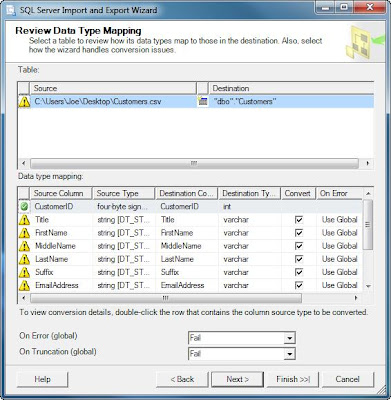
9. Review the data type mappings. Note that I receive warnings about the default DT_STR types, so I ignore them.
