Monday, July 27, 2009

Auditing with the FIM Query Tool

Brad Turner recently received a question from a blog reader:

"I am interested in knowing how can we track/audit which user did a certain change on a user/group account through the ILM portal. Have you written a previous post about this issue? Do you have any information that might help me?"

There are a few ways you could approach this challenge. First, you could find all requests on an object. Here's how you can do that with the FIM Query Tool:

  1. Run the FIM Query Tool and filter for "Request" object types.


  2. Select the following attributes to capture in your audit:
    • Created Time
    • Creator
    • Display Name
    • Operation
    • Request Parameters
    • Target

  3. Change the Reference Format to DisplayName, so that you're not just looking at GUIDs.


  4. Finally, use the following XPath filter:

    /Request[Target = /Person[DisplayName = 'Joe Zamora']]

    To kind of translate this XPath, we're looking for Request objects whose Target matches the following condition: a Person whose display name is "Joe Zamora". In a production scenario, you'd probably want to use the object's GUID to do the search (ObjectId = '12345678-ABCD-1234-ABCD-1234567890AB'), but I use the display name to make it more readable.


One nice feature of the FIM Query Tool is that, because the results are displayed in a data grid view, you can sort results without re-running the query. Just click on a column header to sort by that column.


One additional note on the results set: to see the details of the request, you'll want to pay attention to the RequestParameters attribute. This is where you'll find which attributes were updated and their new values. This is also where the FIM Query Tools falls a bit short. The attribute is stored in XML, and isn't formatted neatly for quick review. There's a good enhancement request!

Now, this query is pretty handy, but if the object has been updated many times, you may find yourself waiting longer than you'd bargained for to see the results of the audit. Brad suggested that we use the XPath historical query functions to narrow the results set down to a certain time window.

So, the second approach is to use the "betweenTime" XPath function to plug in the time window of interest. Try this in the FIM Query Tool with the rest of the settings remaining the same as above:

betweenTime(/Request[Target = /Person[DisplayName = 'Joe Zamora']], '2008-10-31', '2008-12-31')

Voila! Now you see all the users who made updates to the object during your desired time period. Brad also mentioned a few other XPath functions that he and David Lundell presented at TEC 2009:

  • allTime(filter) - Show me the objects that ever satisfied this filter

  • betweenTime(filter, begin datetime, end datetime) - Show me the objects that ever satisfied this filter during the time range specified

  • atTime(filter, datetime) - Show me the object that satisfied the filter at the specified date and time

David builds some good examples here:

Who were payroll admins at the precise moment of the theft?
atTime(/Person[ObjectID = /Group[DisplayName = 'Payroll Admins']/ComputedMember, '2009-02-01T00:00')

Who were the payroll admins in the merry merry month of of May?
betweenTime(/Person[ObjectID = /Group[DisplayName = 'Payroll Admins']/ComputedMember, '2008-05-01T00:00' , '2008-05-31T23:59:59')

Wednesday, July 22, 2009

Webinar: Geneva (aka WIF)

Ensynch will be co-presenting a webinar with Quest next week on the Geneva framework (now called Windows Identity Foundation).


When:
Wednesday, July 29, 2009

10:30 to 11:30 (PST)
12:30 to 1:30 (CST)
1:30 to 2:30 (EST)

Where:
Web/Online
Live Meeting Information
will be sent to attendees

Presenters:
David Lundell,
Identity Management
Practice Leader, Ensynch

Jonathan Sander
IAM and Security Analyst
Quest Software


Webinar: How Microsoft Geneva
Streamlines Business

- Learn How to Reap the Benefits of True Web
 Single-Sign-On and Federation


Has your organization been forced to deploy one-off solutions to solve login or compliance problems with a newly deployed technology?

Are your employees tired of using multiple logins for all kinds of access needs?

Having trouble managing shared resources users both inside and outside of your organization?

Using open platform identity management solution Microsoft Geneva, you can save money and make your business more efficient today, and also make it more easily scalable for the future.

I would like to invite you to our latest exclusive "no frills" webinar: "How Microsoft Geneva Streamlines Business," the 1st in a 4-part Identity Management Webinar Series from Ensynch's Identity Management Practice Leader and Microsoft Identity Management MVP, David Lundell, and Quest Software IAM and Security Analyst, Jonathan Sander.

This webinar is designed for business leaders, and will present business value propositions for the Microsoft Geneva framework. Whether identity management is a major concern for your organization or if you are simply curious about using Microsoft Geneva as an asset to help your business, this webinar is for you.

Webinar Agenda:
- Yikes! The business pain points of managing lots of identities

- High level discussion of Microsoft Geneva

- Business value of Geneva

- Gaps of the Geneva framework

- Possible solutions to the gaps

- ROI of Geneva versus other Single-Sign-On solutions

- Geneva and the Cloud

- Q & A

Stay Tuned for the other three parts of this webinar series:


A Technical Overview of the Microsoft Geneva Infrastructure
Thursday, August 20, 2009

Using the Microsoft Geneva Framework to Solve
Your Federation Needs

Thursday, September 10, 2009

Accelerate Your Businesses for the Future with Microsoft Geneva and the Cloud
Thursday, October 1, 2009


[Register Now]

Tuesday, June 30, 2009

What is SRS?

SRS is the (misused) abbreviation of SSRS ([Microsoft] SQL Server Reporting Services). Yes, that's right; an abbreviation of an acronym. Good grief, folks.

The reason for this short & sweet post is that I see SRS used all the time in certain circles. But if you Google it (or Bing it, whatever your preference), you'll find many other definitions before you come across this one (if you ever do, that is).

Another reason for this post is, of course, that I admittedly once went on a wild goose chase to figure out what someone was asking of me. :)

Sunday, June 7, 2009

Introducing the FIM Query Tool

I've had a bit of downtime recently, so I decided to make good on a statement that I made to my colleagues at lunch one day, "I should create an interface for querying the ILM2 web service." Well, I just polished off a first draft and published it to CodePlex. Please take it for a test drive, kick the tires, and leave me some feedback!

FIM Query Tool

As I mention on the CodePlex site, this tool is a Windows Forms front end to the ILM2 enumeration client. It's intended to be a one-stop shop for testing XPath filters on the ILM2 web service. And although it's called 'FIM Query Tool', it's currently written for the only available version of FIM, which is ILM2 RC0. Obviously, I'm expecting this tool to evolve with the technology.

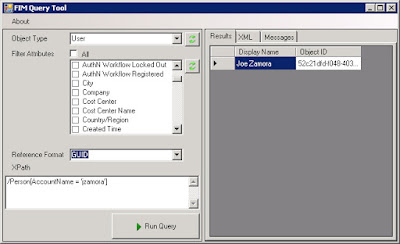
Here's a first glance at the tool.


There are a few bells & whistles on this first draft. First, it populates the object & attribute lists when you first run it, but then it caches those lists so that subsequent sessions are faster. If you create a new object or attribute, you can always refresh the schema with the corresponding buttons.

Next, it uses the extensions formerly known as TEIMO (now called MS-WSTIM) to filter the attributes returned from the web service, so that you can cut down on the SOAP message size and save a bit of time on each query.

The tool displays the results in a table, and although it's not obvious in this first draft, you can use Ctrl-A, Ctrl-C to copy all the cells so that you can paste them into Excel. The tool also gives you the raw XML for your perusing pleasure, as well as some verbose messages on separate tabs.

Finally, you can choose to dereference GUIDs when displaying the output. This means that it will resolve GUIDs to their display names, but if you choose this option, you'll get a warning that performance may be poor.

Now let me mention the biggest limitation of the first draft: there's no filter builder to help you with the XPath syntax. Thus, you're sort of on your own when typing up the XPath filter that you'd like to test. I do give you the underlying attribute name when you skate your mouse over the attributes in the list. I hope this helps you out for now.

One quick note on the application settings. You can find all of the settings in the FIMQueryTool.exe.config file. For example, the enumeration endpoint is set to http://localhost:526/... If you have a different URL for your server/port, you'll have to update this in the config file. Note that I set the SOAP message size to the max (maxReceivedMessageSize="0x7fffffff"), but you may want to tweak other settings like WsEnumerationDefaultPull (batch size).

Oh! I forgot to mention that since this project is on CodePlex, you have access to the source code. Enjoy! Try not to blow anything up. :)

As I mentioned, please download it, try it out, and leave me feedback either through the Discussions section of the CodePlex project or on this blog.

Thursday, June 4, 2009

Create a set with all objects having a non-empty attribute (i.e. XPath filter for 'child exists')

Today I answered a question on the FIM forums, and I thought I'd publish it for reference.

Objective
How can we create a Set of objects whose certain attribute is not blank (meaning that the attribute exists)? For example, how do we create a Set of all people who have a JobTitle assigned? The FilterBuilder won't let you do something like Job Title is not        .

Solution
The answer is that we have to edit the Set's XPath filter manually.

But first, a quick note on semantics. :) In FIM we talk about objects and their attributes, but 'attribute' is something different in XML (which is what XPath is operating on). So, the objective for our XPath query is to find all nodes whose child node (of a certain name) is not blank.

  1. We can begin by using the filter builder as a crutch. Create the following filter with the filter builder:

    Select people that match all of the following conditions:
    Job Title is not junk

    If you view membership, it will give you all people who don't have a job title; and the filter will be:

    /Person[not(JobTitle = 'junk')]

  2. Finish & submit the Set creation.

  3. Go back and edit the Set; Click on Advanced View, and change the filter manually to:

    /Person[JobTitle != 'junk']

  4. Finish and submit the changes.

Now, if you do an XPath query for /Set[DisplayName = 'Those with job title']/ComputedMember, you'll see all people who do have a job title (provided you don't actually have a job title named 'junk').

Monday, May 4, 2009

Webinar recording & slides posted

We've posted the video recording of my April webinar, and you can also download the presentation in PDF format.

Ensynch IDA Resources

Note that I've corrected myself since the webinar. The Enumerate Resources activity does indeed work; there's just a trick to making it work. Please find that trick in my previous post.

Thursday, April 30, 2009

Henrik Nilsson's RegexReplaceActiviy

Henrik just made a great post about his RegexReplaceActivity. In it, he shows you how to capture the power of regular expressions (pun intended :).

While you're developing and tuning your regular expressions, it's handy to have a quick way to test them. I'd like to point you to a phenomenal online resource for testing regex patterns:

http://gskinner.com/RegExr/

If you paste Henrik's sample regex pattern into the site, and then type a date into the text box, it'll highlight the pattern that's matched. Then, if you hold your mouse over the highlighted pattern, it'll show you the groups that are captured. Instant gratification!

Tuesday, April 28, 2009

How to use EnumerateResourcesActivity in RC0

Last week during my webinar, I wasn't sure how to use the EnumerateResources or EnumerateResourceIteration activities. I thought I'd tie up some loose ends and try to crack this case. Thanks to Henrik and Nima, I was able to get the EnumerateResourcesActivity to work. Turns out that the Iteration activity will be removed from RTM.

Per Henrik's advice, EnumerateResources has the wrong designer, so when you add the activity to a custom workflow, you'll notice that it's closed and you can't add any children to it.


You can work around this by opening the Designer.cs file and adding a code activity to it manually. First, add a CodeActivity to the class:

private CodeActivity codeActivity1;

Next, add the code activity to EnumerateResources in InitializeComponent, before the last line, "this.CanModifyActivities = false;".

#region Workaround
this.codeActivity1 = new System.Workflow.Activities.CodeActivity();
//
// codeActivity1
//

this.codeActivity1.Name = "codeActivity1";
this.codeActivity1.ExecuteCode += new System.EventHandler(this.logIteration);

this.enumerateResourcesActivity1.Activities.Add(this.codeActivity1);
#endregion

Then, create a "logIteration" method in your main class file, and call the GetCurrentIterationItem method from EnumerateResources:

private void logIteration(object sender, EventArgs e)
{
// Log the Resource properties to a string
StringBuilder buffer = new StringBuilder();
buffer.AppendLine("TotalResultsCount : " +
enumerateResourcesActivity1.TotalResultsCount);

ResourceType currentItem = EnumerateResourcesActivity.GetCurrentIterationItem(
(CodeActivity)sender) as ResourceType;

if (currentItem != null)
{
// Resource properties
foreach (KeyValuePair<string, ResourcePropertyInfo> property in currentItem.ResourceProperties)
{
// Attribute name
buffer.Append(property.Key.PadRight(20));
// Attribute type
buffer.Append(property.Value.Type.PadRight(20));
// Value
object val = currentItem[property.Key];
if (val != null)
{
buffer.AppendLine(val.ToString());
}
else
{
buffer.AppendLine();
}
}
}

// Finally, do something with the log message
string output = buffer.ToString();
}

That's it. Don't forget to bind the XPathFilter property on the EnumerateResourcesActivity. Perhaps I'll add an example to our activity library.

Enjoy!

Friday, April 17, 2009

ILM 2 password client install snafu

I encountered the following error while attempting to install the password reset client from the ILM 2 program folder (C:\Program Files\Microsoft Identity Management\Web Portals\WSSDir\PasswordManagementClient\ilm-client.msi). I couldn't find much help from an internet search, but David Lundell pointed out my problem. It was a silly but honest mistake, so I thought I'd document it.

Office integration requires Smart Tags .Net Programmability Support. Please install it from the Office CDs (under Office Tools) and try again.


It turns out that, in my haste, I had selected all the defaults of the installation, which is an honest mistake. Since I was installing this on the dev server box for testing, I didn't have Office installed, yet I left the Office Integration component selected for install. The simple answer is to deselect this option during install.


Hope this helps!

ILM2/FIM Custom Workflow Development Webinar

I'll be hosting a webinar geared toward development next week. Please attend and bring your burning questions!


When:
Thursday, April 23rd

Where:

Webinar/Online
(LiveMeeting links will be
sent to all registrants)

Presenter:
Joe Zamora, Ensynch Senior Developer, Identity and Access Management


Time:
9am-10am Pacific/Arizona
(GMT-7)
10am-11am Mountain
11am-12pm Central
12pm-1pm Eastern


Webinar:
Custom Workflows in Identity Lifecycle Manager "2" - Ask the Experts!

You’re invited to attend an informational webinar and technical overview of custom workflows, features and functions available in Identity Lifecycle Manager “2” (ILM 2). This webinar is designed for technical experts who want to gain an understand of the features and benefits of ILM 2 custom workflows to achieve information technology operational efficiency. ILM 2 will dramatically change the way organizations manage information. There is a lot to be excited about, and a spectrum of new features that you’ll need to understand to intelligently discuss how it will impact your business.

Ensynch is proud of our world-class Identity and Access Management practice, led by David Lundell, Brad Turner, both Microsoft MVPs for ILM, along with Joe Zamora, Senior Developer. This team's efforts have earned Ensynch back to back Microsoft World-Wide Partner Awards for Identity Management in 2007 and 2006. Take advantage of this opportunity to learn from their vast enterprise and mid-market experience in incorporating Best Practices in assessing, planning, deploying and managing highly efficient environments with the latest technologies.


Agenda:

ILM “2” Custom Workflow Overview (25 min)
• Motivation
- Out-of-box toolset
- Challenges

• Resources
- SDK
- Connect
- Community content, contributions and resources

• Tools
- Visual Studio workflow designer
- Building block activities
- Public Resource Management Client
- Hidden gems

Demo (25 min)
• Ensynch ILM “2” Activity Library
- Update Attribute Activity
- Owner Rollup Activity
- Generate OID Activity

Question & Answer (10 min)

(Register Now)


Source code posted

We've finally posted the source code to Brad Turner's TEC 2009 workshop. Sorry for the delay; project deliveries are always getting in the way; you know how it goes.

ILM 2 RC0 Ensynch Custom Workflow Activity Library

And a few screen shots for you...


Sorry for the lack of description on these, but I'll be hosting a webinar on them next week. More details on that coming soon...

Friday, March 27, 2009

Installation Instructions for EnsynchILM2ActivityLibrary

Brad Turner has graciously agreed to do me a huge favor and post the code from his TEC workshop on Codeplex for everyone to enjoy. The project is called EnsynchILM2ActivityLibrary, and Brad summarizes it in this post. I apologize that we're initially posting it without a walkthrough document, but I foresee several blog posts using this code, as well as perhaps a webinar or two. Besides, I've been using the Ensynch Diagnostic Activity in all my blog posts thus far, so it'll be nice to have a new starting point.

Brad did, however, agree to post the code on the condition that I supply the installation instructions. So here goes.

  1. Once you have the project saved to your hard drive, open it in Visual Studio and make sure you can Rebuild Solution. Note that we used Visual Studio 2008 to create the project, so that's a prerequisite. Let me know if you have any issues building the project. I ran into (at least) one pitfall that took a little out-of-the-box thinking to solve, but it should be fixed with this project, and I'll save that for another blog post. :)

  2. In the top-leve project folder, double-click the deploy.bat file. Pay attention to the output; you may have to edit the path to 'gacutil' if yours is in a different location. Also, on one of our VMs, the Identity Management service refuses to die right away, so I end up having to restart it from the Services snap-in.

  3. Note that this project contains Joe Schulman's public resource management client, so we'll have to merge its application settings from SampleApplication\app.config into our web service config file. Please follow the instructions in my earlier post to make the changes.

  4. Our Owner Rollup Activity uses a Filter Builder control, and there's a trick to making it render correctly. The trick is to copy the contents of the FilterBuilder.css file into your SharePoint Core.css file. I've already described this step in a previous post, so please follow those instructions and come back here when you're done.

  5. Now we have tell ILM 2 where to find the web interfaces for our activities (called ActivitySettingsPart). In this step, we'll be creating Activity Information Configuration objects. Once again, I've spawned off a separate post to reduce the clutter in this one. Please follow the instructions in that post and return here when finished.

  6. Finally, you'll have to run the deploy.bat file again in order for the changes we made in the last steps to take effect.


Now you should see the activities show up in the Activity Picker when you create a Workflow in the ILM 2 portal. I encourage you to experiment with the code, and feel free to leave me any comments on issues you run into or aspects that you'd like to see explained. Remember that when you make a change to the code, you'll have to repeat steps 1 & 2 above.

Have fun!

Create Activity Information Configuration objects for EnsynchILM2ActivityLibrary activities

This is another unit step that was spawned from a separate post to reduce clutter.

We're going to tell ILM 2 where to find the web interfaces (ActivitySettingsPart) for our activities in the EnsynchILM2ActivityLibrary. In the ILM 2 portal, click on All Resources, Activity Information Configuration. For each of the following activities, create a new Activity Information Configuration object, and enter the following settings.

Owner Rollup Activity

ParameterValue
DescriptionWalk the manager chain to find a suitable owner.
Display NameOwner Rollup Activity
Activity NameEnsynch.ILM2.Workflow.Activities.OwnerRollupActivity
Assembly NameEnsynch.ILM2, Version=1.0.0.0, Culture=neutral, PublicKeyToken=f7965571e90fcf53
Is Action Activity
Is Authentication Activity
Is Authorization Activity
Type NameEnsynch.ILM2.WebUI.Controls.OwnerRollupActivitySettingsPart


Update Attribute Activity

ParameterValue
DescriptionAn interim solution to the Function Evaluator limitations.
Display NameUpdate Attribute Activity
Activity NameEnsynch.ILM2.Workflow.Activities.UpdateAttributeActivity
Assembly NameEnsynch.ILM2, Version=1.0.0.0, Culture=neutral, PublicKeyToken=f7965571e90fcf53
Is Action Activity
Is Authentication Activity
Is Authorization Activity
Type NameEnsynch.ILM2.WebUI.Controls.UpdateAttributeActivitySettingsPart


Note that there is one more activity, "Generate OID Activity", that you could add. However, this one was built with several schema extension dependencies for Brad Turner's TEC 2009 workshop, so I chose to leave that one out of this post.

Merge Joe Schulman's Public Client's Settings into ILM 2's Web Service Config File

This is a unit step that I separated from another post in order to keep it uncluttered.

We're going to merge the contents of Joe Schulman's public client into the ILM 2 web service config file. You can find the public client's config file under the project folder at SampleApplication\app.config, but I provide the complete contents in my instructions below.

Locate your ILM 2 web service config file. Mine is at C:\Program Files\Microsoft Identity Management\Common Services\Microsoft.ResourceManagement.Service.exe.config. First of all, make a backup copy of this file. Then, edit the original with the following changes. Note: I heard that I've confused some people with my use of ellipses (sorry!), so I'll try to explain things a little better.

Your config file already contains a root element named "configuration" and a child element named "configSections", so I've greyed them out below. Also, I've added an ellipsis (...) to show that the "configSections" element contains other existing children (which you shouldn't touch, by the way). I want you to place the following bold text inside the "configSections" element, and after its existing children.

<configuration>

<configSections>

...


<!--Begin PublicResourceManagementClient-->
<sectionGroup name="applicationSettings" type="System.Configuration.ApplicationSettingsGroup, System, Version=2.0.0.0, Culture=neutral, PublicKeyToken=b77a5c561934e089" >
<section name="Microsoft.ResourceManagement.Samples.ResourceManagementClient.Settings" type="System.Configuration.ClientSettingsSection, System, Version=2.0.0.0, Culture=neutral, PublicKeyToken=b77a5c561934e089" requirePermission="false" />
</sectionGroup>
<!--End PublicResourceManagementClient-->


</configSections>

...

</configuration>

Okay, now let's place the next block of bold text immediately after the closing "configSections" tag. So, this block will be a direct child of the root "configuration" element.

<configuration>

<configSections>

...

</configSections>

<!--Begin PublicResourceManagementClient-->
<applicationSettings>
<Microsoft.ResourceManagement.Samples.ResourceManagementClient.Settings>
<setting name="WsEnumerationDefaultExpiresAdd" serializeAs="String">
<value>15</value>
</setting>
<setting name="WsEnumerationDefaultPull" serializeAs="String">
<value>15</value>
</setting>
<setting name="IlmSchemaFilename" serializeAs="String">
<value>IlmSchema.xsd</value>
</setting>
</Microsoft.ResourceManagement.Samples.ResourceManagementClient.Settings>
</applicationSettings>
<!--End PublicResourceManagementClient-->


...

</configuration>

All right, one more (long) code block to go; hang in there! Now, your config file already contains a "system.serviceModel" element, which is also a child of the root "configuration" element. The "system.serviceModel" element already contains children, also (hence, another ellipsis below it). I want you to copy the following bold text inside the "system.serviceModel" element, but after its existing children.

<configuration>

...

<system.serviceModel>

...


<!--Begin PublicResourceManagementClient-->
<bindings>
<wsHttpBinding>
<binding name="MetadataExchangeHttpBinding_IMetadataExchange"
closeTimeout="00:01:00" openTimeout="00:01:00" receiveTimeout="00:10:00"
sendTimeout="00:01:00" bypassProxyOnLocal="false" transactionFlow="false"
hostNameComparisonMode="StrongWildcard" maxBufferPoolSize="524288"
maxReceivedMessageSize="965536" messageEncoding="Text" textEncoding="utf-8"
useDefaultWebProxy="true" allowCookies="false">
<readerQuotas maxDepth="32" maxStringContentLength="8192" maxArrayLength="16384"
maxBytesPerRead="4096" maxNameTableCharCount="16384" />
<reliableSession ordered="true" inactivityTimeout="00:10:00"
enabled="false" />
<security mode="None">
<transport clientCredentialType="Windows" proxyCredentialType="None"
realm="" />
<message clientCredentialType="Windows" negotiateServiceCredential="true"
establishSecurityContext="true" />
</security>
</binding>
</wsHttpBinding>
<wsHttpContextBinding>
<binding name="ServiceMultipleTokenBinding_Resource" closeTimeout="00:01:00"
openTimeout="00:01:00" receiveTimeout="00:10:00" sendTimeout="00:01:00"
bypassProxyOnLocal="false" transactionFlow="false" hostNameComparisonMode="StrongWildcard"
maxBufferPoolSize="524288" maxReceivedMessageSize="65536"
messageEncoding="Text" textEncoding="utf-8" useDefaultWebProxy="true"
allowCookies="false" contextProtectionLevel="Sign">
<readerQuotas maxDepth="32" maxStringContentLength="8192" maxArrayLength="16384"
maxBytesPerRead="4096" maxNameTableCharCount="16384" />
<reliableSession ordered="true" inactivityTimeout="00:10:00"
enabled="false" />
<security mode="Message">
<transport clientCredentialType="Windows" proxyCredentialType="None"
realm="" />
<message clientCredentialType="Windows" negotiateServiceCredential="true"
algorithmSuite="Default" establishSecurityContext="false" />
</security>
</binding>
<binding name="ServiceMultipleTokenBinding_ResourceFactory" closeTimeout="00:01:00"
openTimeout="00:01:00" receiveTimeout="00:10:00" sendTimeout="00:01:00"
bypassProxyOnLocal="false" transactionFlow="false" hostNameComparisonMode="StrongWildcard"
maxBufferPoolSize="524288" maxReceivedMessageSize="65536"
messageEncoding="Text" textEncoding="utf-8" useDefaultWebProxy="true"
allowCookies="false" contextProtectionLevel="Sign">
<readerQuotas maxDepth="32" maxStringContentLength="8192" maxArrayLength="16384"
maxBytesPerRead="4096" maxNameTableCharCount="16384" />
<reliableSession ordered="true" inactivityTimeout="00:10:00"
enabled="false" />
<security mode="Message">
<transport clientCredentialType="Windows" proxyCredentialType="None"
realm="" />
<message clientCredentialType="Windows" negotiateServiceCredential="true"
algorithmSuite="Default" establishSecurityContext="false" />
</security>
</binding>
<binding name="ServiceMultipleTokenBinding_Search" closeTimeout="00:01:00"
openTimeout="00:01:00" receiveTimeout="00:10:00" sendTimeout="00:01:00"
bypassProxyOnLocal="false" transactionFlow="false" hostNameComparisonMode="StrongWildcard"
maxBufferPoolSize="524288" maxReceivedMessageSize="165536"
messageEncoding="Text" textEncoding="utf-8" useDefaultWebProxy="true"
allowCookies="false" contextProtectionLevel="Sign">
<readerQuotas maxDepth="32" maxStringContentLength="8192" maxArrayLength="16384"
maxBytesPerRead="4096" maxNameTableCharCount="16384" />
<reliableSession ordered="true" inactivityTimeout="00:10:00"
enabled="false" />
<security mode="Message">
<transport clientCredentialType="Windows" proxyCredentialType="None"
realm="" />
<message clientCredentialType="Windows" negotiateServiceCredential="true"
algorithmSuite="Default" establishSecurityContext="false" />
</security>
</binding>
<binding name="ServiceMultipleTokenBinding_Resource1" closeTimeout="00:01:00"
openTimeout="00:01:00" receiveTimeout="00:10:00" sendTimeout="00:01:00"
bypassProxyOnLocal="false" transactionFlow="false" hostNameComparisonMode="StrongWildcard"
maxBufferPoolSize="524288" maxReceivedMessageSize="65536"
messageEncoding="Text" textEncoding="utf-8" useDefaultWebProxy="true"
allowCookies="false" contextProtectionLevel="Sign">
<readerQuotas maxDepth="32" maxStringContentLength="8192" maxArrayLength="16384"
maxBytesPerRead="4096" maxNameTableCharCount="16384" />
<reliableSession ordered="true" inactivityTimeout="00:10:00"
enabled="false" />
<security mode="Message">
<transport clientCredentialType="Windows" proxyCredentialType="None"
realm="" />
<message clientCredentialType="Windows" negotiateServiceCredential="true"
algorithmSuite="Default" establishSecurityContext="false" />
</security>
</binding>
</wsHttpContextBinding>
</bindings>
<client>
<endpoint address="http://localhost:526/ResourceManagementService/Resource"
binding="wsHttpContextBinding" bindingConfiguration="ServiceMultipleTokenBinding_Resource"
contract="Resource" name="ServiceMultipleTokenBinding_Resource" />
<endpoint address="http://localhost:526/ResourceManagementService/ResourceFactory"
binding="wsHttpContextBinding" bindingConfiguration="ServiceMultipleTokenBinding_ResourceFactory"
contract="ResourceFactory" name="ServiceMultipleTokenBinding_ResourceFactory" />
<endpoint address="http://localhost:526/ResourceManagementService/Enumeration"
binding="wsHttpContextBinding" bindingConfiguration="ServiceMultipleTokenBinding_Search"
contract="Search" name="ServiceMultipleTokenBinding_Search" />
<endpoint address="http://localhost:526/ResourceManagementService/Alternate"
binding="wsHttpContextBinding" bindingConfiguration="ServiceMultipleTokenBinding_Resource1"
contract="Resource" name="ServiceMultipleTokenBinding_Resource1" />
<endpoint address="http://localhost:526/ResourceManagementService/MEX"
binding="wsHttpBinding" bindingConfiguration="MetadataExchangeHttpBinding_IMetadataExchange"
contract="IMetadataExchange"
name="MetadataExchangeHttpBinding_IMetadataExchange" />
</client>
<!--End PublicResourceManagementClient-->


</system.serviceModel>

...

</configuration>

That's it! You'll know that you had a typo if the service refuses to restart. For completeness, I've posted our config file, in case you'd like to compare notes with a program like ExamDiff.

Our ILM 2 web service config file with merged app settings from Joe Schulman's public client

Below you'll find the contents of our ILM 2 web service config file (Microsoft.ResourceManagement.Service.exe.config) merged with application settings from Joe Schulman's public client. This is for comparison purposes only. You shouldn't replace your current config file with this one, and you should always make a backup of yours before editing.

<configuration>
<configSections>
<section name="resourceManagementClient" type="Microsoft.ResourceManagement.WebServices.Client.ResourceManagementClientSection, Microsoft.ResourceManagement"/>
<section name="resourceManagementService" type="Microsoft.ResourceManagement.WebServices.ResourceManagementServiceSection, Microsoft.ResourceManagement.Service"/>
<!--Begin PublicResourceManagementClient-->
<sectionGroup name="applicationSettings" type="System.Configuration.ApplicationSettingsGroup, System, Version=2.0.0.0, Culture=neutral, PublicKeyToken=b77a5c561934e089" >
<section name="Microsoft.ResourceManagement.Samples.ResourceManagementClient.Settings" type="System.Configuration.ClientSettingsSection, System, Version=2.0.0.0, Culture=neutral, PublicKeyToken=b77a5c561934e089" requirePermission="false" />
</sectionGroup>
<!--End PublicResourceManagementClient-->
</configSections>
<!--Begin PublicResourceManagementClient-->
<applicationSettings>
<Microsoft.ResourceManagement.Samples.ResourceManagementClient.Settings>
<setting name="WsEnumerationDefaultExpiresAdd" serializeAs="String">
<value>15</value>
</setting>
<setting name="WsEnumerationDefaultPull" serializeAs="String">
<value>15</value>
</setting>
<setting name="IlmSchemaFilename" serializeAs="String">
<value>IlmSchema.xsd</value>
</setting>
</Microsoft.ResourceManagement.Samples.ResourceManagementClient.Settings>
</applicationSettings>
<!--End PublicResourceManagementClient-->
<appSettings>
<!-- Setup adds entries -->
<add key="synchronizationServerName" value="ILM2RC0-TEC"/>
<add key="SyncEngineAccount" value="idchaos\svc.ilmma"/>
</appSettings>
<system.serviceModel>
<services>
<service name="Microsoft.ResourceManagement.WebServices.ResourceManagementService" behaviorConfiguration="throttling">
<host>
<baseAddresses>
<add baseAddress="http://localhost:526"/>
</baseAddresses>
</host>
</service>
<service name="Microsoft.ResourceManagement.WebServices.SecurityTokenService">
<host>
<baseAddresses>
<add baseAddress="http://localhost:527"/>
</baseAddresses>
</host>
</service>
</services>
<behaviors>
<serviceBehaviors>
<behavior name="throttling">
<serviceThrottling maxConcurrentInstances="50"/>
</behavior>
</serviceBehaviors>
</behaviors>
<!--Begin PublicResourceManagementClient-->
<bindings>
<wsHttpBinding>
<binding name="MetadataExchangeHttpBinding_IMetadataExchange"
closeTimeout="00:01:00" openTimeout="00:01:00" receiveTimeout="00:10:00"
sendTimeout="00:01:00" bypassProxyOnLocal="false" transactionFlow="false"
hostNameComparisonMode="StrongWildcard" maxBufferPoolSize="524288"
maxReceivedMessageSize="965536" messageEncoding="Text" textEncoding="utf-8"
useDefaultWebProxy="true" allowCookies="false">
<readerQuotas maxDepth="32" maxStringContentLength="8192" maxArrayLength="16384"
maxBytesPerRead="4096" maxNameTableCharCount="16384" />
<reliableSession ordered="true" inactivityTimeout="00:10:00"
enabled="false" />
<security mode="None">
<transport clientCredentialType="Windows" proxyCredentialType="None"
realm="" />
<message clientCredentialType="Windows" negotiateServiceCredential="true"
establishSecurityContext="true" />
</security>
</binding>
</wsHttpBinding>
<wsHttpContextBinding>
<binding name="ServiceMultipleTokenBinding_Resource" closeTimeout="00:01:00"
openTimeout="00:01:00" receiveTimeout="00:10:00" sendTimeout="00:01:00"
bypassProxyOnLocal="false" transactionFlow="false" hostNameComparisonMode="StrongWildcard"
maxBufferPoolSize="524288" maxReceivedMessageSize="65536"
messageEncoding="Text" textEncoding="utf-8" useDefaultWebProxy="true"
allowCookies="false" contextProtectionLevel="Sign">
<readerQuotas maxDepth="32" maxStringContentLength="8192" maxArrayLength="16384"
maxBytesPerRead="4096" maxNameTableCharCount="16384" />
<reliableSession ordered="true" inactivityTimeout="00:10:00"
enabled="false" />
<security mode="Message">
<transport clientCredentialType="Windows" proxyCredentialType="None"
realm="" />
<message clientCredentialType="Windows" negotiateServiceCredential="true"
algorithmSuite="Default" establishSecurityContext="false" />
</security>
</binding>
<binding name="ServiceMultipleTokenBinding_ResourceFactory" closeTimeout="00:01:00"
openTimeout="00:01:00" receiveTimeout="00:10:00" sendTimeout="00:01:00"
bypassProxyOnLocal="false" transactionFlow="false" hostNameComparisonMode="StrongWildcard"
maxBufferPoolSize="524288" maxReceivedMessageSize="65536"
messageEncoding="Text" textEncoding="utf-8" useDefaultWebProxy="true"
allowCookies="false" contextProtectionLevel="Sign">
<readerQuotas maxDepth="32" maxStringContentLength="8192" maxArrayLength="16384"
maxBytesPerRead="4096" maxNameTableCharCount="16384" />
<reliableSession ordered="true" inactivityTimeout="00:10:00"
enabled="false" />
<security mode="Message">
<transport clientCredentialType="Windows" proxyCredentialType="None"
realm="" />
<message clientCredentialType="Windows" negotiateServiceCredential="true"
algorithmSuite="Default" establishSecurityContext="false" />
</security>
</binding>
<binding name="ServiceMultipleTokenBinding_Search" closeTimeout="00:01:00"
openTimeout="00:01:00" receiveTimeout="00:10:00" sendTimeout="00:01:00"
bypassProxyOnLocal="false" transactionFlow="false" hostNameComparisonMode="StrongWildcard"
maxBufferPoolSize="524288" maxReceivedMessageSize="165536"
messageEncoding="Text" textEncoding="utf-8" useDefaultWebProxy="true"
allowCookies="false" contextProtectionLevel="Sign">
<readerQuotas maxDepth="32" maxStringContentLength="8192" maxArrayLength="16384"
maxBytesPerRead="4096" maxNameTableCharCount="16384" />
<reliableSession ordered="true" inactivityTimeout="00:10:00"
enabled="false" />
<security mode="Message">
<transport clientCredentialType="Windows" proxyCredentialType="None"
realm="" />
<message clientCredentialType="Windows" negotiateServiceCredential="true"
algorithmSuite="Default" establishSecurityContext="false" />
</security>
</binding>
<binding name="ServiceMultipleTokenBinding_Resource1" closeTimeout="00:01:00"
openTimeout="00:01:00" receiveTimeout="00:10:00" sendTimeout="00:01:00"
bypassProxyOnLocal="false" transactionFlow="false" hostNameComparisonMode="StrongWildcard"
maxBufferPoolSize="524288" maxReceivedMessageSize="65536"
messageEncoding="Text" textEncoding="utf-8" useDefaultWebProxy="true"
allowCookies="false" contextProtectionLevel="Sign">
<readerQuotas maxDepth="32" maxStringContentLength="8192" maxArrayLength="16384"
maxBytesPerRead="4096" maxNameTableCharCount="16384" />
<reliableSession ordered="true" inactivityTimeout="00:10:00"
enabled="false" />
<security mode="Message">
<transport clientCredentialType="Windows" proxyCredentialType="None"
realm="" />
<message clientCredentialType="Windows" negotiateServiceCredential="true"
algorithmSuite="Default" establishSecurityContext="false" />
</security>
</binding>
</wsHttpContextBinding>
</bindings>
<client>
<endpoint address="http://localhost:526/ResourceManagementService/Resource"
binding="wsHttpContextBinding" bindingConfiguration="ServiceMultipleTokenBinding_Resource"
contract="Resource" name="ServiceMultipleTokenBinding_Resource" />
<endpoint address="http://localhost:526/ResourceManagementService/ResourceFactory"
binding="wsHttpContextBinding" bindingConfiguration="ServiceMultipleTokenBinding_ResourceFactory"
contract="ResourceFactory" name="ServiceMultipleTokenBinding_ResourceFactory" />
<endpoint address="http://localhost:526/ResourceManagementService/Enumeration"
binding="wsHttpContextBinding" bindingConfiguration="ServiceMultipleTokenBinding_Search"
contract="Search" name="ServiceMultipleTokenBinding_Search" />
<endpoint address="http://localhost:526/ResourceManagementService/Alternate"
binding="wsHttpContextBinding" bindingConfiguration="ServiceMultipleTokenBinding_Resource1"
contract="Resource" name="ServiceMultipleTokenBinding_Resource1" />
<endpoint address="http://localhost:526/ResourceManagementService/MEX"
binding="wsHttpBinding" bindingConfiguration="MetadataExchangeHttpBinding_IMetadataExchange"
contract="IMetadataExchange"
name="MetadataExchangeHttpBinding_IMetadataExchange" />
</client>
<!--End PublicResourceManagementClient-->
</system.serviceModel>
<resourceManagementClient resourceManagementServiceBaseAddress="http://localhost:526"/>
<resourceManagementService certificateName="IdentityLifeCycleManager2" confirmHumanity="false"/>
</configuration>

Copy the Contents of FilterBuilder.css into SharePoint Core.css

This is a unit step that I need to reference in other blog posts, so I separated it out from a previous post.

Locate your Core.css file. Mine is located at C:\Program Files\Common Files\Microsoft Shared\Web Server Extensions\12\TEMPLATE\LAYOUTS\1033\STYLES\CORE.CSS. Edit the file and paste the following CSS code at the very end.

/*FilterBuilder.css*/
.anchorText
{
color:#1C0BF3;
font:9pt Tahoma;
font-weight:bold;
vertical-align:middle;
}

.bottomRightAngleTreeCell
{
width:10px;
height:5pt;
font-size:xx-small;
border-left: medium solid #d5e4ff;
border-top: thin solid #d5e4ff;
}

.collapseConditionButton
{
width:10px;
height:10px;
position:relative;
left:-7px;
bottom:-9px;
border-style:none;
}

.conditionDivision
{
background-color:#d5e4ff;
height:16pt;
width:100%;
}

.conditionText
{
font:9pt Tahoma;
color:#404040;
vertical-align:middle;
}

.deleteConditionButton
{
width:10px;
height:10px;
position:relative;
top:-12px;
right:2px;
border-style:none;
float:right
}

.deleteConditionButtonDateEditMode
{
width:10px;
height:10px;
position:relative;
top:-13px;
right:2px;
border-style:none;
float:right;
}

.deleteConditionButtonSelectionEditMode
{
width:10px;
height:10px;
position:relative;
top:-19px;
right:2px;
border-style:none;
float:right;
}

.deleteConditionButtonTextEditMode
{
width:10px;
height:10px;
position:relative;
top:-23px;
right:2px;
border-style:none;
float:right;
}

.errorText
{
font:9pt Tahoma;
color:#DC143C;
font-weight:bold;
vertical-align:middle;
}

.expandConditionButton
{
width:10px;
height:10px;
position:relative;
left:-5px;
bottom:-6px;
border-style:none;
}

.headingSpan
{
font:9pt Tahoma;
color:black;
font-weight:bold;
vertical-align:middle;
}

.horizontalBarTreeCell
{
width:10px;
height:5pt;
font-size:xx-small;
border-top: thin solid #d5e4ff;
}

.inlineDivision
{
display: inline;
}

.leftMarginTreeCell
{
width:20px;
font-size:xx-small;
}

.outermostContainer
{
width: 100%;
overflow: visible;
}

.searchNotification
{
display: inline;
}

.searchNotificationImage
{
width:10px;
height:10px;
position:relative;
top:2px;
border-style:none;
}

.select
{
font:9pt Tahoma;
color:black;
font-weight:bold;
vertical-align:middle;
}

.spacerTreeCell
{
width:10px;
height:5pt;
font-size:xx-small;
}

.textBox
{
color:#000000;
font:8pt Tahoma;
font-weight:normal;

}

.topRightAngleTreeCell
{
width:10px;
height:5pt;
font-size:xx-small;
border-left: medium solid #d5e4ff;
border-bottom: thin solid #d5e4ff;
}

.treeCell
{
font-size:xx-small;
}

.verticalBarTreeCell
{
width:10px;
height:5pt;
font-size:xx-small;
border-left: medium solid #d5e4ff;
}

Saturday, March 21, 2009

Add a FitlerBuilder Control to an ActivitySettingsPart - Part 2

Now, before we finish wiring the FilterBuilder into the ActivitySettingsPart, there's something we have to do in the Activity itself. We have to create the property to which we'll save the filter that we built.

Open the Activity by right-clicking on the EnsynchDiagnosticActivity.cs file in the Solution Explorer, and select View Code. Add a dependency property called "BuilderFilter" to the class:

public static DependencyProperty BuilderFilterProperty =
DependencyProperty.Register("BuilderFilter", typeof(System.String),
typeof(EnsynchDiagnosticActivity));

[DesignerSerializationVisibilityAttribute(DesignerSerializationVisibility.Visible)]
[BrowsableAttribute(true)]
[Category("Properties")]
public String BuilderFilter
{
get
{
return ((string)(base.GetValue(EnsynchDiagnosticActivity.BuilderFilterProperty)));
}
set
{
base.SetValue(EnsynchDiagnosticActivity.BuilderFilterProperty, value);
}
}

Okay, that's it for the Activity. You may be asking the screen, "Do we need to create a dependency property?" Well, no; but dependency properties help you unlock the power of Windows Workflow Foundation. The discussion is out of scope of this blog post, but I suggest an internet search for, "What is a dependency property?"

Now let's return to our ActivitySettingsPart (EnsynchDiagnosticActivityUI.cs). There are several override methods in which we have to include our FilterBuilder. Here is a summary of those methods.

Override MethodPurpose
GenerateActivityOnWorkflowThis is essentially the "Save" operation. When you click the Save button, the web application calls this method, expecting you to create an instance of your Activity and save all the input that the user has supplied into that Activity.
LoadActivitySettingsThe counterpart to the "Save" operation, which is essentially a "Load" operation. When you reopen the workflow in the portal, the web application passes the Activity data (which you saved in the Generate method) back to you, and expects you to determine how it's rendered.
PersistSettingsThis is ILM's version of the ASP.NET SaveViewState method, which is necessitated by the stateless nature of HTTP. You can think of it as a (required) method to temporarily store the user's input without committing it to a full-blown Activity.
RestoreSettingsThe counterpart to the Persist method. This is where you load the temporarily saved data.
SwitchModeThis method is called when the interface switches between "Edit" and "View" modes. In Edit mode, your web controls should be enabled and fully editable. In View mode, they should be on their read-only settings. The web application calls this method to, once again, allow you to determine how your interface should be rendered for each mode.


As you may have picked up on, there seems to be some overlap between the "Generate" and "Persist" methods, as well as the "Load" and "Restore" methods. In the former two, we have to extract the filter from the FilterBuilder, and in the latter two, we have to load the filter back into the FilterBuilder. As you'll see, these operations are more than just a one-liner, so we'll write a couple of helper methods to take care of them and avoid code repetition.

The two methods below are how we translate between the FilterBuilder control and the filter string that we save/load.

private string getBuilderFilter()
{
FilterType filter;
bool success = filterBuilder.TryGetFilter(
"http://schemas.microsoft.com/2006/11/XPathFilterDialect", out filter);
if (success)
{
return filter.Text;
}
return "";
}

private void setBuilderFilter(string value)
{
if (!string.IsNullOrEmpty(value))
{
FilterType filter = new FilterType();
filter.Dialect = "http://schemas.microsoft.com/2006/11/XPathFilterDialect";
filter.Text = value;
filterBuilder.SetFilter(filter);
}
}

If Visual Studio fails to resolve the FilterType class, you'll have to add its namespace to the beginning of the class:

using Microsoft.ResourceManagement.WebServices.WSEnumeration;

All right, now we can call our helper methods from the override methods. In the code samples below, I've left out most of the existing code, and just added the calls in the appropriate places.

public override Activity GenerateActivityOnWorkflow(SequentialWorkflow workflow)
{
...

activity.BuilderFilter = getBuilderFilter();
...
}

public override void LoadActivitySettings(Activity activity)
{
OwnerRollupActivity activity2 = activity as OwnerRollupActivity;
if (activity2 != null)
{
...

setBuilderFilter(activity2.BuilderFilter);
...
}
}

public override ActivitySettingsPartData PersistSettings()
{
ActivitySettingsPartData data = new ActivitySettingsPartData();
...

data["BuilderFilter"] = getBuilderFilter();
...
return data;
}

public override void RestoreSettings(ActivitySettingsPartData data)
{
if (data != null)
{
...

setBuilderFilter("" + data["BuilderFilter"]);
...
}
}

Okay, the last thing to do is to add the FilterBuilder to the SwitchMode method. However, before I do that, I can't help but do a little code cleanup here. Here's why: just by looking at the following line of code, can you tell me what it does?

SetControlAccess("txtActivityName", flag);

You may be able to guess that "control access" means that we're switching between edit and read-only modes, but what are we setting it to? What the heck does "flag" represent?

Let's start by renaming the SetControlAccess method. Actually, while we're at it, let's add a little more error checking as well.

private void setControlReadOnly(string controlID, Boolean readOnly)
{
Control target = this.FindControl(controlID);
if (target.GetType() == typeof(TextBox))
{
TextBox oText = (TextBox)target;
if (oText != null)
{
oText.ReadOnly = readOnly;
}
}
}

Ahhh, much better! Now, let's update the SwitchMode method with the new method name, rename the mysterious "flag" variable, and add our FilterBuilder to the mix.

public override void SwitchMode(ActivitySettingsPartMode mode)
{
bool readOnly = mode == ActivitySettingsPartMode.View;
setControlReadOnly("txtActivityName", readOnly);
setControlReadOnly("txtFilePath", readOnly);
setControlReadOnly("txtFileName", readOnly);
filterBuilder.ReadOnly = readOnly;
}

Hey, look at that! We've demystified our code, and now adding the FilterBuilder was a snap!

That's it for adding the FilterBuilder to the ActivitySettingsPart. Now you can build & deploy the project, and here are a few things that you can do to test in the ILM 2 portal:

  1. Create a new Workflow and add the modified Diagnostic Activity. Manipulate the FilterBuilder and click Save.
  2. Expand the activity again. Is the FilterBuilder read-only?
  3. Click the Edit button. Can you now edit the filter?
  4. Click Save again, and then Finish and Submit the workflow.
  5. Reopen the workflow and expand the activity. Is this the same filter you saved?

Another test that you can do to show off a cool feature of the FilterBuilder is to edit the activity, click Add Statement, and then try to Save. The FilterBuilder has its own error messages; very nice.

Well, that's it for now. To be honest, I've sort of left you hanging. You're probably wondering, "Wait a minute, how do you use the filter that we've saved in the activity?" The short answer is: you have to use a web service client to ask ILM to resolve the filter. Now, don't panic, Joe Schulman has released a sample client on MSDN that you may be able to incorporate.

Still a bit worried? Well, I have good news for you! As Brad Turner mentions in his blog, we will be releasing the source code for a complete custom activity library, which includes the use of the Public Resource Mangement Client, as well as several custom activities, one of which uses the FilterBuilder in a clever way. In fact, Brad is at TEC 2009 right now, and he'll be instructing a lab that uses the custom activities. And if you're signed up for his workshop, I'm pretty sure he'll let you take the source code with you if you can't wait for us to post it.

Enjoy!

Sunday, March 15, 2009

Add a FitlerBuilder Control to an ActivitySettingsPart - Part 1

I've had a few requests to post more examples on making cool workflow interfaces inside ILM 2 with the ActivitySettingsPart. I thought I'd start with one of the best interface features of ILM 2 (IMHO), and show you how to add a FitlerBuilder control to a custom workflow activity.

Once again, I'll use the Ensynch Diagnostic Activity as a starting point, so if you'd like to follow along, please download this handle little guy and make sure it builds, installs, and shows up correctly. I'll show you a few screen shots of the interface along the way to emphasize some important points. Keep in mind that I'm still running RC0, and this stuff is subject to change.

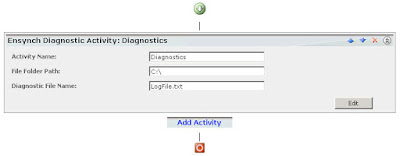
As promised, here's the first screen shot. This is what your diagnostic activity should look like before we begin (without the background image, of course).


Okay, now let's edit the ActivitySettingsPart. Open the EnsynchDiagnosticActivityUI.cs file (our derived class), and add the FilterBuilder as a class member at the very top of the class.


class EnsynchDianosticActivityUI : ActivitySettingsPart
{
private FilterBuilder filterBuilder;
...

You should notice that the FilterBuilder resolves correctly (light-blue color). This is because we already have a reference to the
Microsoft.IdentityManagement.WebUI.Controls namespace.

Next, let's visit the InitializeControls method and add the FilterBuilder to the very end.


// Create the table row and cell
TableRow tableRow = new TableRow();
TableCell tableCell = new TableCell();
// Let the FilterBuilder extend across the entire table width
tableCell.ColumnSpan = 2;
// Instantiate the FilterBuilder; nothing to it!
filterBuilder = new FilterBuilder();
// Embed the FilterBuilder into DIV tag to assign CSS
Panel filterBuilderPanel = new Panel();
// CSS is built into the DLL, but we'll have to use a workaround
filterBuilderPanel.CssClass = "uocFilterBuilder";
// Finally, wire it all together
filterBuilderPanel.Controls.Add(filterBuilder);
tableCell.Controls.Add(filterBuilderPanel);
tableRow.Cells.Add(tableCell);
child.Rows.Add(tableRow);

At this point, you can rebuild and redeploy the project. Now your activity should look like so:


Are you thinking what I'm thinking? This doesn't exactly look like the FilterBuilder that you see everywhere else in the ILM 2 portal. What happened to the CSS? Well, you may have noticed that we didn't reference the CSS anywhere in the code. Reason being, our controls are loaded asynchronously, after all the CSS has already been loaded. Even though we may be able to point to the CSS file in the Microsoft.IdentityManagement.WebUI.Controls.dll library, we can't tell the page to load it from our ActivitySettingsPart. Luckily, there's at least one workaround (I would gladly like to hear other ideas).

If you're running Red Gate's .NET Reflector, you can easily find the CSS file in the library I just mentioned. But don't worry, I'll provide it for you in its entirety below. The workaround is to copy the contents of the FilterBuilder.css file into the SharePoint Core.css file, as I describe in this post.

Now run iisreset, and check out the workflow again. Much better!


Sorry to cut this short, but I'll have to wait until next time to show you how to finish wiring the FilterBuilder into the ActivitySettingsPart. Stay tuned...

Update: Part 2 is complete!

Tuesday, March 3, 2009

Caution binding multi-valued activity properties

Someone ran into this problem while following my blog post on account name generation, so I thought I'd detail the steps of the pitfall. Here's the scenario: you followed all the steps for the custom workflow activity to generate an account name, but the account name doesn't update at all after testing the activity in an ILM 2 workflow. Well, you may have incorrectly bound the multi-valued UpdateParameters property on the UpdateResourceActivity. It's an easy mistake to make, as I'll show you.

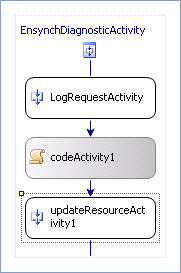
Okay, let's trace our steps. You've just dragged a new UpdateResourceActivity onto your custom workflow.


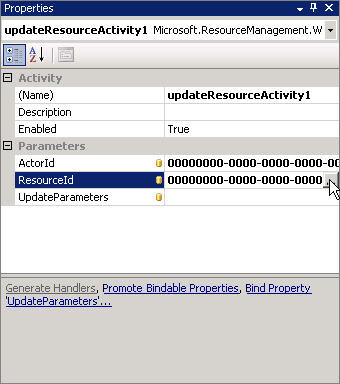
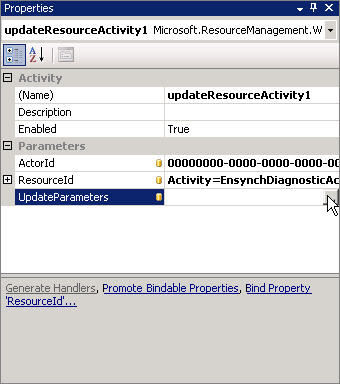
Now, you want to bind the (single-valued) ResourceId property to a new field. In the Properties window in Visual Studio, you click on the ResourceId property, and then click on the elipsis button.


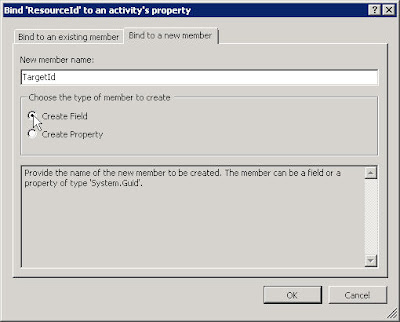
Now you see a dialog in which you choose an existing field/property or create a new one. In my earlier blog post, I instructed you to create a new field named "TargetId".


So far, so good. Next, you want to bind the (multi-valued) UpdateParameters property to a new field. You click on the UpdateParameters property and click on the elipsis again.


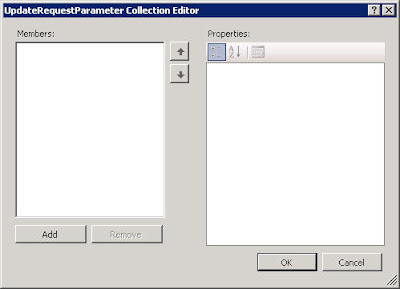
Wait, what's this? You don't see the same dialog that you saw for the single-valued property.


How do you bind the property in the same way you did with the single-valued property with this dialog? The answer is: you don't. If you were to attempt to do the same by clicking the Add button, what you're actually doing is assigning the UpdateParameters in the designer-generated code, which isn't where we want to do it. We want to assign the UpdateParameters from our code activity.

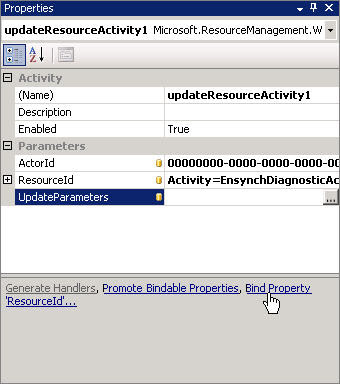
Cancel out of the dialog and, instead of clicking on the elipsis, click on the "Bind Property..." link below.


Now you see the appropriate dialog, and you can create a new field named "MyUpdateParameters" to which you'll bind this property.

Sometimes Visual Studio will disable the "Bind Property..." link when it's not supposed to. This can make things especially confusing. I was able to get Visual Studio to re-enable the link with the following steps:
  1. Click on the elipsis for the multi-valued property.
  2. In the Collection Editor dialog, click Add and then Remove.
  3. Click OK to close the dialog.
One final note: you actually don't have to bind the UpdateParameters property. You can assign it directly from the UpdateResourceActivity object:

//--- Add the account name to the update parameters.
updateResourceActivity1.UpdateParameters = new UpdateRequestParameter[]
{
new UpdateRequestParameter("AccountName",
UpdateMode.Modify, accountName)
};

Friday, February 20, 2009

View the raw SOAP messages (only) in ILM 2 trace log

Have you come across the advice to "turn on tracing" in ILM 2 to view the raw SOAP messages? Earlier this week, I spent a whole day trying to figure out the best way to do this, and it turns out it's REALLY SIMPLE. But first, some background. :)

I said to myself, "Self, this should be possible with a network sniffer, right?" I downloaded Netmon; wow, that was ugly, and I never even found the SOAP messages. Then I tried Ethereal/Wireshark; no luck. EffeTech HTTP sniffer; nada. I was about to try TcpMon and/or SOAP Trace Utility, when I had a revelation. This stuff's built on Windows Communication Foundation; shouldn't there be a utility to trace this sophisticated API? Finally, this was the right question to ask.

Turns out the message tracing is built into WCF. And while you may have enabled tracing in your ILM 2 web service, there's actually a way to enable tracing on only the SOAP messages. Nice, huh? Here's a link to the MSDN article on how to turn on message logging, but I'll go through the exact steps for you to try to save you some time.

Before I begin, I should mention that Andreas Kjellman posted an answer to a question on the Connect site on how to enable tracing, but his directions weren't exclusive to the SOAP messages.

  1. Begin by locating your web service config file. Mine is at C:\Program Files\Microsoft Identity Management\Common Services\Microsoft.ResourceManagement.Service.exe.config. Edit the file and add the following bold sections.
    <configuration>

    ...


    <!-- Begin Message Logging/Tracing -->
    <system.diagnostics>
    <trace autoflush="true" />
    <sources>
    <source name="System.ServiceModel.MessageLogging">
    <listeners>
    <add
    name="messages"
    type="System.Diagnostics.XmlWriterTraceListener"
    initializeData="c:\logs\Messages.svclog" />
    </listeners>
    </source>
    </sources>
    </system.diagnostics>
    <!-- End Message Logging/Tracing -->

    ...

    <system.serviceModel>


    <!-- Begin Message Logging/Tracing Settings -->
    <diagnostics>
    <messageLogging
    logEntireMessage="true"
    logMalformedMessages="true"
    logMessagesAtServiceLevel="true"
    logMessagesAtTransportLevel="false"
    maxMessagesToLog="0x7fffffff"
    maxSizeOfMessageToLog="0x7fffffff"/>
    </diagnostics>
    <!-- End Message Logging/Tracing Settings -->

    ...

    </system.serviceModel>

    ...

    </configuration>


  2. As Andreas points out in his instructions, make sure the service host account has write permissions to the C:\logs folder.

  3. Save the file and restart the Microsoft Identity Lifecycle Manager Service (IdentityManagementService).

    The log file can grow pretty quickly, so you may want to isolate the logging to only a few requests. To stop logging, simply comment the listener (shown here) and restart the service.


    <!--<add name="messages"
    type="System.Diagnostics.XmlWriterTraceListener"
    initializeData="c:\logs\Messages.svclog" />
    -->

  4. The .svclog file will open in the Service Trace Viewer (SvcTraceViewer.exe), which is installed with the Windows SDK for Windows Server 2008 and .NET Framework 3.5. Just try double-clicking the file first, if you're not sure you have it installed. You might also find it at C:\Program Files\Microsoft SDKs\Windows\v6.1\Bin\SvcTraceViewer.exe (or similar).

  5. In the Service Trace Viewer, click on the activity in the left pane and click on a message log trace. In the bottom pane, you'll see the details of the SOAP message. Click on the XML tab in the bottom pane and you'll find the SOAP envelope in its entirety inside the trace XML (SOAP envelope begins with "s:Envelope").

I hope this helps you. Best of luck!